前言
在现代化软件开发与团队协作中,GitLab作为领先的代码托管与DevOps平台,其用户管理效率直接影响团队协作效能。随着企业团队规模扩大、项目数量激增,传统的手动管理方式(如逐个创建用户、分配权限)已无法满足高效运维需求。通过GitLab提供的RESTful API实现批量用户管理,成为提升运维效率、保障安全合规的关键技术手段。
准备工作
开启token
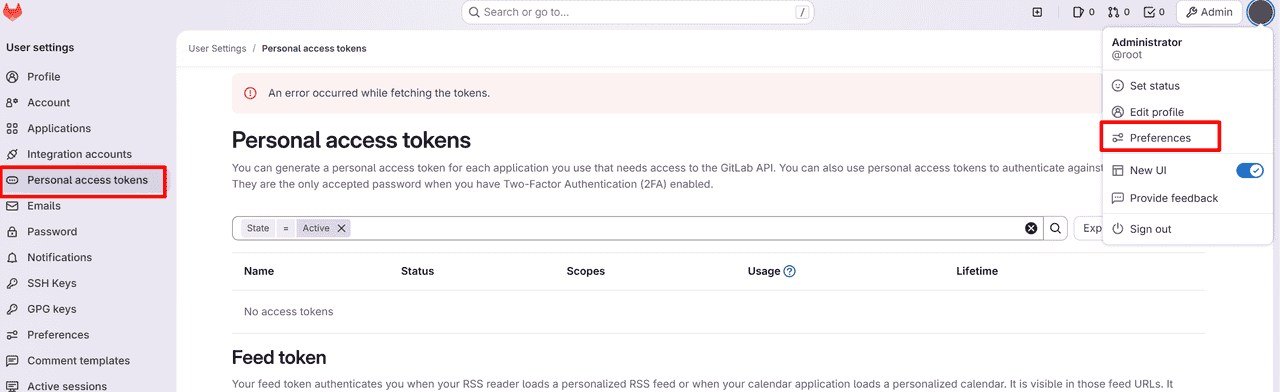
登陆系统–>点击个人的头像–>点击个人中心(设置)–> 个人访问令牌–>设置好令牌**(中文)**

点击个人的头像–>Prefereces–> Personal access tokens–> create token (英文)
了解接口API
GitLab API(当前最新版本为v4)提供完整的用户管理接口,支持以下核心操作:
用户创建:POST /api/v4/users(支持设置邮箱、用户名、密码、姓名等字段)用户查询:GET /api/v4/users(支持按ID、用户名、邮箱等条件筛选)权限分配:POST /api/v4/groups/:id/members(将用户加入组并设置角色)信息修改:PUT /api/v4/users/:id(批量更新用户邮箱、密码、状态等)账户删除:DELETE /api/v4/users/:id(批量禁用或删除账户)
具体的可见:https://docs.gitlab.cn/docs/jh/api/import/
上代码
使用HttpPost的方式直接调用接口,未外用GitLab4 api的接口,阅读都也可通过该API方式直接调用
步骤1:添加Maven依赖
 <dependency>
      <groupId>org.apache.httpcomponents</groupId>
      <artifactId>httpclient</artifactId>
      <version>4.5.5</version>
      <exclusions>
        <exclusion>
          <artifactId>commons-codec</artifactId>
          <groupId>commons-codec</groupId>
        </exclusion>
      </exclusions>
    </dependency>
    <dependency>
      <groupId>org.glassfish.web</groupId>
      <artifactId>jakarta.servlet.jsp.jstl</artifactId>
      <version>2.0.0</version>
    </dependency>
    <dependency>
      <groupId>com.alibaba</groupId>
      <artifactId>fastjson</artifactId>
      <version>1.2.51</version>
    </dependency>
步骤2:创建用户接口
public static boolean createUser(String username,String name,String email){
        try {
            CloseableHttpClient httpclients = HttpClients.createDefault();
            HttpPost httpPost = new HttpPost("http://127.0.0.1:8088/api/v4/users");
            List<NameValuePair> pairs = new ArrayList<>();
            //private_token为上面生成的值
            pairs.add(new BasicNameValuePair("private_token","*******************"));
            pairs.add(new BasicNameValuePair("username",username));
            pairs.add(new BasicNameValuePair("password","abc987456123"));
            pairs.add(new BasicNameValuePair("name",name));
            pairs.add(new BasicNameValuePair("email",email));
            //pairs.add(new BasicNameValuePair("reset_password","true"));
            UrlEncodedFormEntity formEntity = new UrlEncodedFormEntity(pairs,"UTF-8");
            httpPost.setEntity(formEntity);
            CloseableHttpResponse response = httpclients.execute(httpPost);
            HttpEntity httpEntity = response.getEntity();
            String result =  EntityUtils.toString(httpEntity,"UTF-8");
            JSONObject object = JSON.parseObject(result);
            System.err.println(result);
            if(object.containsKey("message")){
                return false;
            }
        }catch (Exception e){
            e.printStackTrace();
        }
        return true;
步骤3:HttpPost封装
public static String HttpPost(String url, String jsonString){
        CloseableHttpResponse response = null;
        CloseableHttpClient httpClient = HttpClientBuilder.create().build();//创建CloseableHttpClient
        HttpPost httpPost = new HttpPost(url);//实现HttpPost
        RequestConfig requestConfig = RequestConfig.custom().setSocketTimeout(3000).setConnectTimeout(3000).build();
        httpPost.setConfig(requestConfig); //设置httpPost的状态参数
        httpPost.addHeader("Content-Type", "application/json");//设置httpPost的请求头中的MIME类型为json
        StringEntity requestEntity = new StringEntity(jsonString, "utf-8");
        httpPost.setEntity(requestEntity);//设置请求体
        try {
            response = httpClient.execute(httpPost, new BasicHttpContext());//执行请求返回结果
            if (response.getStatusLine().getStatusCode() != HttpStatus.SC_OK) {
                return null;
            }
            HttpEntity entity = response.getEntity();
            if (entity != null) {
                String resultStr = EntityUtils.toString(entity, "utf-8");
                return resultStr;
            } else {
                return null;
            }
        } catch (Exception e) {
            System.out.println("httpPost method exception handle-- > " + e);
            return null;
        } finally {
            if (response != null){
                try {
                    response.close();//最后关闭response
                } catch (IOException e) {
                    System.out.println("httpPost method IOException handle -- > " + e);
                }
            }if(httpClient != null){try {httpClient.close();} catch (IOException e) { System.out.println("httpPost method exception handle-- > " + e);}
            }
        }
    }
步骤4:配置用户的权限
public static boolean invitations(String userid,String email){
        try {
            CloseableHttpClient httpclients = HttpClients.createDefault();
            HttpPost httpPost = new HttpPost("http://172.16.84.186:8777/api/v4/groups/38/invitations");
            List<NameValuePair> pairs = new ArrayList<>();
            //private_token为上面生成的值
            pairs.add(new BasicNameValuePair("private_token","glpat-4G3D0CjnakhEHkAqgFIwsG86MQp1OjEH.01.0w1x1aghr"));
            pairs.add(new BasicNameValuePair("user_id",userid));
            pairs.add(new BasicNameValuePair("access_level","50"));
            UrlEncodedFormEntity formEntity = new UrlEncodedFormEntity(pairs,"UTF-8");
            httpPost.setEntity(formEntity);
            CloseableHttpResponse response = httpclients.execute(httpPost);
            HttpEntity httpEntity = response.getEntity();
            String result =  EntityUtils.toString(httpEntity,"UTF-8");
            JSONObject object = JSON.parseObject(result);
            System.err.println(result);
            if(object.containsKey("message")){
                return false;
            }
        }catch (Exception e){
            e.printStackTrace();
        }
        return true;
    }
步骤5:删除用户
    public static boolean delUser(String username){
        try {
            CloseableHttpClient httpclients = HttpClients.createDefault();
            HttpDelete httpDelete = new HttpDelete("http://172.16.84.186:8777/api/v4/users"+"/"+username);
            //private_token为上面生成的值
            URI uri = new URIBuilder(httpDelete.getURI())
                    //private_token为上面生成的值
                    .addParameter("private_token", "glpat-b-929N0LRZBRxmVAPFz1tG86MQp1OjEH.01.0w026evo0")
                    .build();
            httpDelete.setURI(uri);
            CloseableHttpResponse response = httpclients.execute(httpDelete);
            // 处理数据
            HttpEntity httpEntity = response.getEntity();
            //String s = EntityUtils.toString(httpEntity);
            System.err.println(httpEntity);
        }catch (Exception e){
            e.printStackTrace();
        }
        return true;
    }
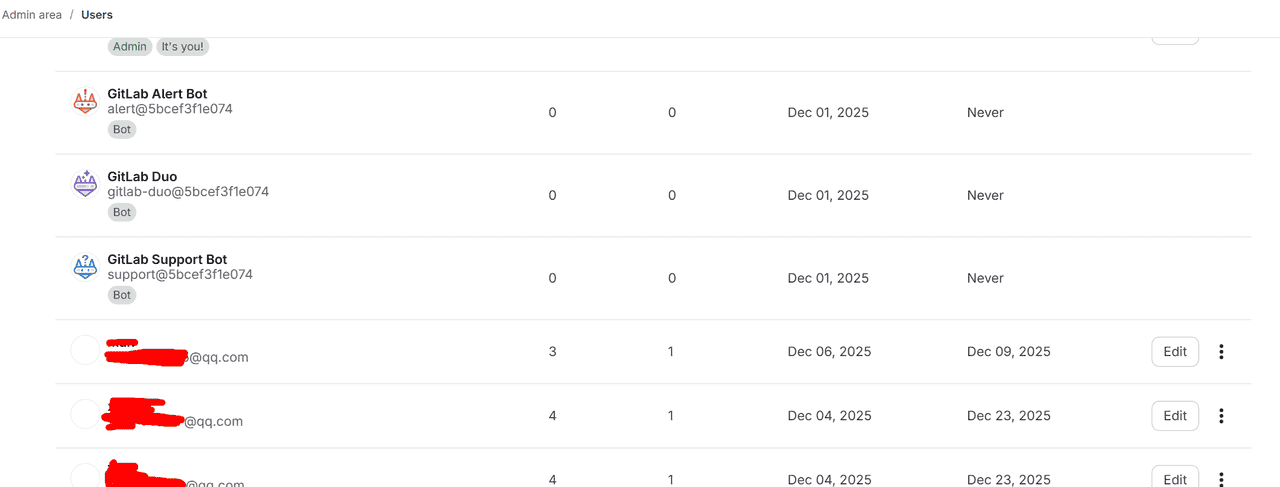
运行结果
可以看到用户已经插入成功了,后续通过接口还可以做更多的调用,如项目管理方面,用户的修改,组的修改等一系列的功能,开发者可自行尝试
总结
本文简要介绍了如何通过GitLab API实现用户提交记录的批量获取与分析,旨在为开发者提供高效的数据采集方案。实际应用中,该技术可延伸至代码贡献统计、开发者行为分析等场景。鉴于GitLab API体系庞大(当前v4版本包含超过200个接口),本文仅涉及提交信息查询这一典型场景,更多高级功能(如Merge Request分析、CI/CD流水线数据获取等)有待进一步探索。
文中若有表述不当或技术偏差之处,恳请各位指正b( ̄▽ ̄)d
© 版权声明
文章版权归作者所有,未经允许请勿转载。
相关文章


暂无评论...